Three-Way Lighting Circuit Wiring
The 3-way lighting circuit, which is often referred to as the two-way and intermediate lighting circuit, is a common arrangement usually found in large houses.
If you are familiar with wiring a two way lighting circuit, then the addition of an extra switching point will not be much of a problem.
Let's have a look at a basic wiring diagram describing a three-way lighting circuit:
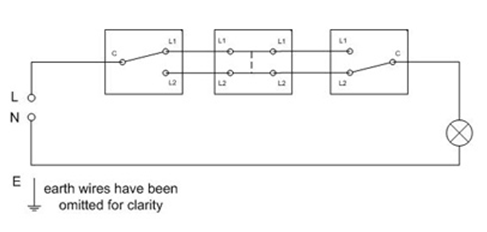

As you can see, the only difference from the two-way lighting circuit is the introduction of a special switch called the intermediate switch. This switch is specially designed for this purpose and must not be mistaken for a two-way switch.
Modern three-way lighting wiring
Generally, lighting circuits in domestic and most commercial installations are wired with the use of flat Twin&Earth and 3 Core&Earth cables. This is also true for the three-way lighting circuit.
To maintain the integrity of the flat Twin&Earth and 3 Core&Earth cable, we must wire up the circuit in accordance with the diagram below (click to enlarge):
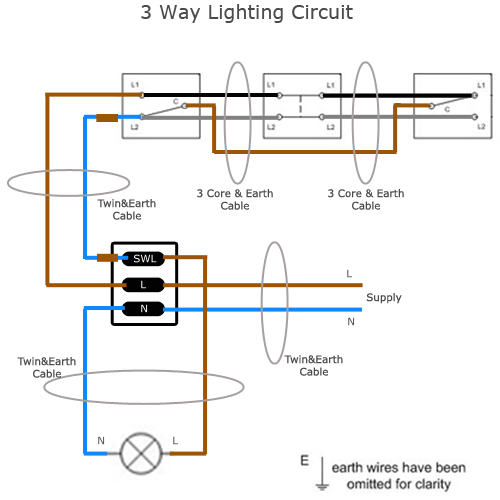
Let's break the wiring method down to steps:
Step 1: The first length of cable will be from the supply to the light itself. Usually the light base or pendant provides all the terminals necessary to wire up the lighting circuit. If this is not the case, push-in or strip connectors are the preferred way of connecting up the circuit. Connect the supply Line conductor to the spare (L) terminal and connect the Neutral conductor to the N terminal, together with the lamps Neutral wire.
Do not forget to connect the Earth conductors to the Earth terminal provided!
Remember: DO NOT connect this cable to the live supply! This must only be done after the whole circuit is finished and fully tested to comply with BS 7671. Also, a Safe Isolation Procedure will have to be carried out!
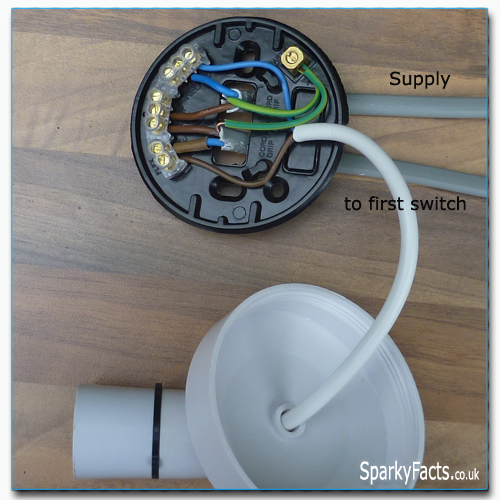
Step 2: The next length of Twin&Earth cable will run from the light to the first two-way switch. Connect the Line (brown) wire to the L terminal, together with the supply cable Line wire and connect the blue wire with the brown slewing to the SWL terminal together with the lamps Line wire. Do not forget to use brown slewing on the blue wire! This is needed to indicate that an otherwise Neutral wire (blue) is now used as a switched Line wire. Once connected the light pendant should look like this (click to enlarge):
Do not forget to connect the Earth conductors to the Earth terminal provided!
Step 3: Now it is time for the switching arrangement to be connected up. Wiring a three-way switch happens with the use of the 3 Core&Earth cable. This cable consists of three cores - brown, grey and black, which are all Line colours, and an Earth wire.
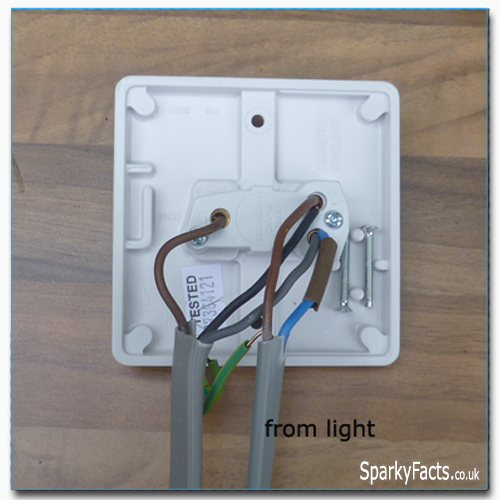
Connect the Line (brown) wire coming from the light together with the 3 Core&Earth cable black wire, in to the L1 terminal of the two-way switch. Connect the blue wire with the brown slewing coming from the light, to the L2 terminal, together with the 3 Core&Earth cable grey wire. Finally, connect the 3 Core&Earth cable brown wire in to the C (common) terminal. This is how the two-way switch wiring should look like:
Do not forget to connect the Earth conductors to the Earth terminal provided!
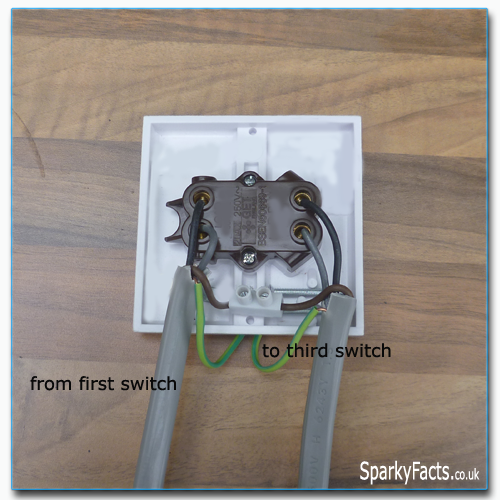
Step 4: Now it is time to wire up the intermediate switch. Connect the black wire from the first two way switch to the L1 terminal, and connect the grey wire to the L2 terminal.
At this point you must connect the brown wire to the next length of cable brown wire, with the use of push-in terminals or strip terminals. Unfortunately, the intermediate switch does not have a dedicated terminal for the third core of the 3 Core&Earth cable.
After this step, connect the second length of the 3 Core&Earth cable black wire to the opposite L1 terminal and the grey cable to the opposite L2 terminal. The intermediate switch wiring should look like this:
Do not forget to connect the Earth conductors to the Earth terminal provided.
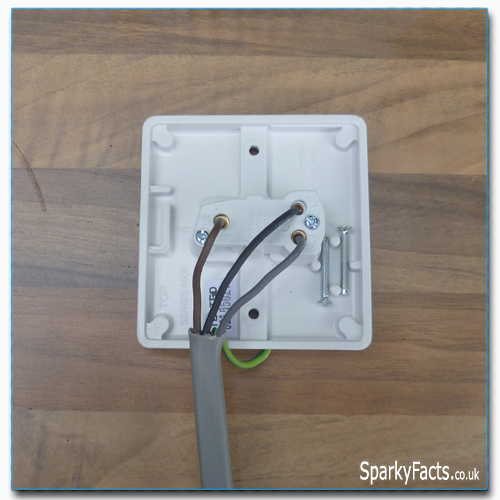
Step 5: Finally, connect the third switch, which is a two way switch, to the second length of the 3 Core&Earth cable. Connect the black wire to the L1 terminal, the grey wire to the L2 terminal and the brown wire to the C (common) terminal. Once connected it should look like this:
Do not forget to connect the Earth conductors to the Earth terminal provided!
Extending the three-way lighting circuit
What if you need more than one light on the circuit?
If you need to switch more than one light from the same series of switches, than all you need to do is to wire up the additional lights parallel to the existing light. This means connecting the Line and the Neutral wires of the new light to the Line and the Neutral of the first light.
What if you have to wire up other areas with different switching arrangements from the same circuit?
In this case you will have to take the supply from the first light in to the new area and connect it to the first light in that area.
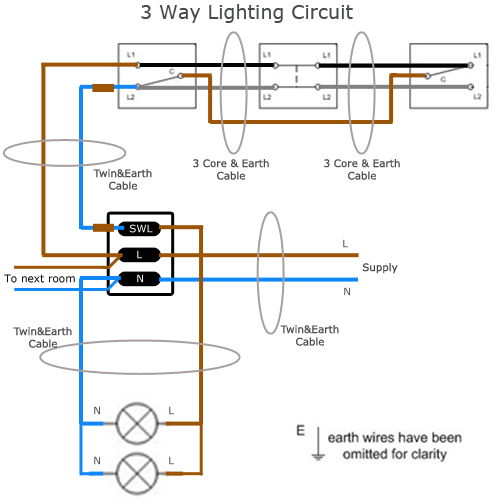
The above diagram describes both of these scenarios (click to enlarge). This concludes the wiring of the 3-way lighting circuit.
![]() Do not forget - electricity kills! Make sure you take all the precautions necessary to work safe. Before working on an existing electrical installation, or before connecting a new circuit to one - carry out a full Safe Isolation Procedure! This guide will help you understand the procedure required. Work smart! Work safe!
Do not forget - electricity kills! Make sure you take all the precautions necessary to work safe. Before working on an existing electrical installation, or before connecting a new circuit to one - carry out a full Safe Isolation Procedure! This guide will help you understand the procedure required. Work smart! Work safe!


