How To Wire A Simple Lighting Circuit
Wring a simple lighting circuit might be an easy enough process for a qualified electrician, and with a little determination anybody with basic skills can do it.
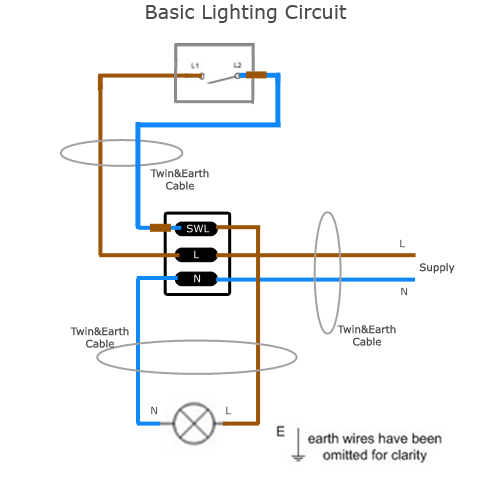
First let's have a look at this wiring diagram describing a lighting circuit in its most basic form:


As you can see, a basic lighting circuit consists only of three components: supply, switch and light.
In order to energise the light, we need to connect it to the supply available. This is usually a distribution board of some sort. However, in this guide we'll focus on the lighting circuit wiring.
The connection to a distribution board will be discussed another time.
If the light is connected to a live supply (Line and Neutral wires) it will light up. In order to make the switching possible we need to introduce a switch in the Line side of the circuit, effectively breaking or making the circuit whenever we need the light on or off.
Modern lighting circuit wiring
If you look at the above diagram again, you will see that both Line and Neutral wires are described as standalone cables going to the necessary points. In real life however, you can very rarely do this sort of arrangement. Today only some of the big industrial installations are wired this way with the use of Singles Cable enclosed in steel conduit or steel trunking containment.
In domestic and most commercial installations we would use simple flat Twin&Earth cable which comprises a Line, Neutral and Earth conductor all together in an outer sheet.
This means that if we want to maintain the integrity of the cable throughout its length, we need to think of a slightly different approach to wiring the lighting circuit.
This is where the wiring diagram below comes in to place (click to enlarge):

As you can see on this diagram, between every point of the installation (supply, switch and light) there is a set of wires running. The wires are enclosed in an outer sheet and are flat Twin&Earth cables.
This wiring diagram shows how all houses and most of commercial lighting installations are wired these days. It is a modern way of wiring which reduces breaks in the cable and makes the work much easier and faster.
Let's break down the wiring to steps.
Step 1: The first thing we need to understand is how to wire a light pendant. Light pendants are mostly used in domestic environments, but the principle of wiring is similar to all types of light fittings.
The first thing to do is to run a length of cable from the supply (distribution board) to the light itself. DO NOT connect this cable to the live supply! This must only be done after the whole circuit is finished and fully tested to comply with BS 7671. Also, a Safe Isolation Procedure will have to be carried out!
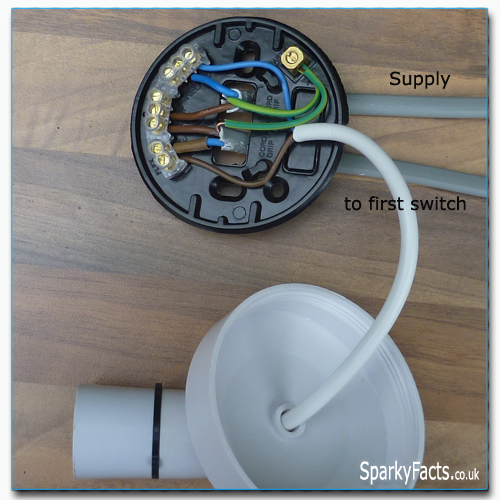
Step 2: Connect the supply cable to the L and N terminals. Connect Line (brown) to L terminal and Neutral (Blue) to N terminal. The L terminal if not labelled is the one without any wires connected to it. The N terminal will already have a wire connected for the lamps Neutral supply.
In the case of a standard domestic light pendant, these terminals will be provided basing on the pendant. Most other lights will also have all of these terminals (SWL, L, N) provided. If these connectors are not provided then you must use push-in connectors or strip connectors to make all the necessary connections.
Do not forget to connect the Earth wire to the Earth terminal.
Step 3: Now you must run a length of flat Twin&Earth cable from the light to the switch. Connect the Line (brown) conductor to the L terminal at the light and connect the blue wire with the brown slewing to the SWL terminal. The SWL terminal is the terminal with the wire going to the lamp itself. Do not forget to connect the Earth wire to the Earth terminal.
Do not forget the brown slewing! Without it, the blue wire indicates a Neutral wire. You must use the brown slewing to indicate the switched Line wire. Once connected the light pendant should look like this (click to enlarge):

This is how you wire a light pendant. Once you know this, every other lighting circuit will be easy to wire because the principles are the same.
Step 4: Connect the switch to the cable coming from the light. Line (brown) to the L1 terminal and blue with the brown slewing to the L2 terminal. Again, do not forget the brown slewing to indicate the switched Line wire. Do not forget to connect the Earth wire to the Earth terminal.
This will make up the loop that forms the switched Line wire.
In effect this is exactly the same wiring as the diagram on the top of the page, but with the utilisation of the flat Twin&Earth cable.
Once tested and connected to the live supply, the lighting circuit will be operational.
Extending the lighting circuit
Now you know how to wire a basic lighting circuit with one light switched at one point.
What if you need more than one light switched from the same switch?
We have extended to wiring diagram above to describe what you need to do (click to enlarge):

As you can see, if you need more lights added on to the same circuit, you just have to connect them parallel to the first light.
This means that you need to run a length of flat Twin&Earth cable from the first light to the second and connect the Line and Neutral wires parallel with the first lamps Line and Neutral wire. Connect the Line (brown) wire to the SWL terminal, together with the lamps Line wire, and connect the Neutral (blue) wire to the N terminal.
If you need more lights on the same circuit, switched from the same switch, you will have to repeat the process, by connecting the third light to the second, and if needed the fourth light to the third and so on.
What if you have more than one area to light up, but you need every area to be switched from a dedicated switch?
In this case you will have to continue the supply cable from the first light in the first area, to the first light in the second area.
In other words, instead of taking the supply for your second area from the distribution board, you would take it from the first area. In this way you can run a supply cable from room to room and supply as many areas as necessary. This practice will reduce the cable needed to wire up several areas and make the job much more easer and simpler. Think about it as looping from one room to another.
Of course once the supply is in the new area, a new switch will have to be wired up to operate the light or lights in the area.
This concludes our guide for wiring a basic lighting circuit. On the next pages we will describe how to wire two-way lights and three-way lights.
![]() Do not forget - electricity kills! Make sure you take all the precautions necessary to work safe. Before working on an existing electrical installation, or before connecting a new circuit to one - carry out a full Safe Isolation Procedure! This guide will help you understand the procedure required. Work smart! Work safe!
Do not forget - electricity kills! Make sure you take all the precautions necessary to work safe. Before working on an existing electrical installation, or before connecting a new circuit to one - carry out a full Safe Isolation Procedure! This guide will help you understand the procedure required. Work smart! Work safe!


