

Two-Way Lighting Circuit Wiring
Two way switching is the most common requirement for many household and commercial lighting solutions. Whether it is the switching of a light from two different places inside a domestic dwelling or switching a series of lights in a commercial environment, two-way lighting circuits provide a cost effective and easy solution.
Let's have a look at a basic circuit diagram describing two-way switch wiring:

Similarly to a simple (one way) lighting circuit, the Neutral is taken straight to the light itself, while the Line conductor is fed through a series of switches before reaching the light.
While this diagram describes the circuit in its most efficient form, the only way to wire it is with the use of Singles Cable. This type of cable is only used in industrial environment where the cables are enclosed in steel conduit or trunking for mechanical protection.
Modern two-way lighting wiring
In both domestic and commercial environments, the preferred choice of cable is the flat Twin&Earth. This cable is relatively cheap and easy to work with. It comes in many different sizes, but the most common size for wiring lighting circuits is the 1.5mm2, which is available as flat 3 Core&Earth as well.
The 3 Core&Earth cable differs from the Twin&Earth on having an additional core, which can prove very helpful when wiring two-way or 3-way lighting circuits.
This cable is usually protected by a 6A MCB. Off course cable sizes and protective device requirements can vary from job to job.
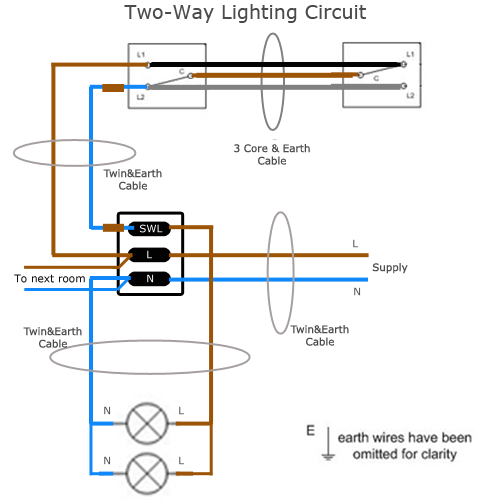
When using flat Twin&Earth cable, it is of great importance to maintain the integrity of the cable throughout its length. In order to do this, we will have to use the circuit diagram provided below (click to enlarge):
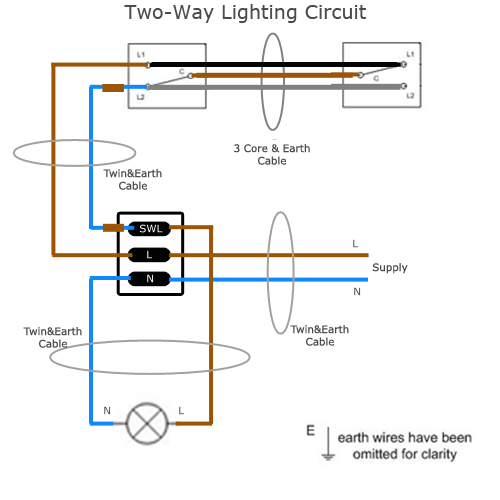
This circuit diagram describes the wiring a two way switch in such an arrangement so that the flat Twin&Earth and 3 Core&Earth cables are not broken or interrupted anywhere between the components of the circuit. It is essentially the same circuit diagram as the one on the top of this page, but with the utilisation of modern cable arrangements for domestic and commercial wiring.
Let's break down the wiring in to steps.
Step 1: The first step is to wire up the light pendant. The first length of cable will be from the supply to the light itself. Usually the light base or pendant provides all the terminals necessary to wire up the lighting circuit. If this is not the case, push-in or strip connectors are the preferred way of connecting up the circuit. Connect the supply Line conductor to the spare (L) terminal and connect the Neutral conductor to the N terminal, together with the lamps Neutral wire.
Do not forget to connect the Earth conductors to the Earth terminal provided!
Remember; DO NOT connect this cable to the live supply! This must only be done after the whole circuit is finished and fully tested to comply with BS 7671. Also, a Safe Isolation Procedure will have to be carried out!
Step 2: The next length of the Twin&Earth cable will run from the light to the first two-way switch. Connect the Line (brown) wire to the L terminal, together with the supply cable Line wire and connect the blue wire with the brown slewing to the SWL terminal together with the lamps Line wire. Do not forget to use brown slewing on the blue wire! This is needed to indicate that an otherwise Neutral wire (blue) is now being used as a switched Line wire. Once connected the light pendant should look like this (click to enlarge):
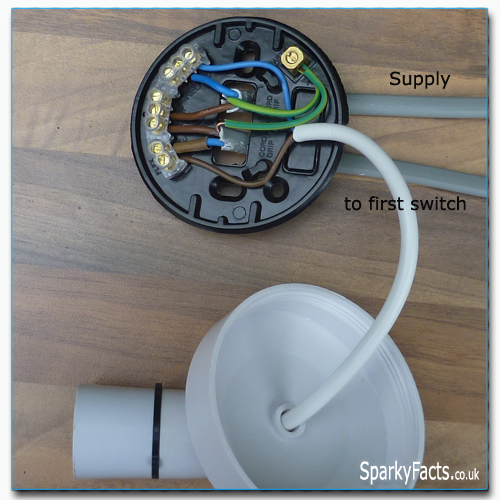
Do not forget to connect the Earth conductors to the Earth terminal provided!
Step 3: Now it is time for the switching arrangement to be connected up. For wiring a two way switch 3 Core&Earth cable is used. This cable consists of three cores –brown, grey and black, which are all Line colours and an Earth wire.
Connect the Line (brown) wire coming from the light together with the 3 Core&Earth cable black wire, in to the L1 terminal of the two-way switch. Connect the blue wire with the brown slewing coming from the light, to the L2 terminal, together with the 3 Core&Earth cable grey wire. Finally, connect the 3 Core&Earth cable brown wire in to the C (common) terminal. This is how the two-way switch wiring should look like:
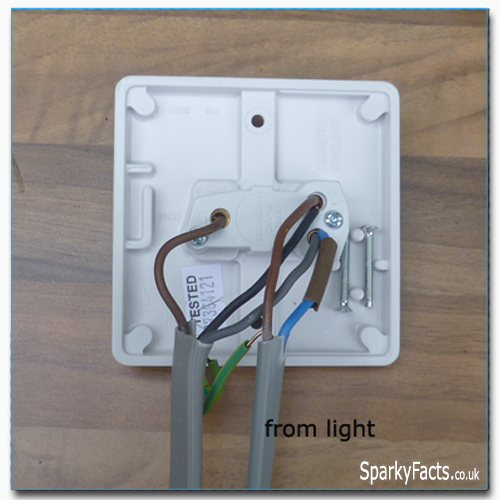
Do not forget to connect the Earth conductors to the Earth terminal provided!
Step 4. Now it is time to wire up the second two-way switch. Connect the black wire coming from the first two-way switch to the L1 terminal, connect the grey wire to the L2 terminal and connect the brown wire to the C (common) terminal. Once connected it should look like this:
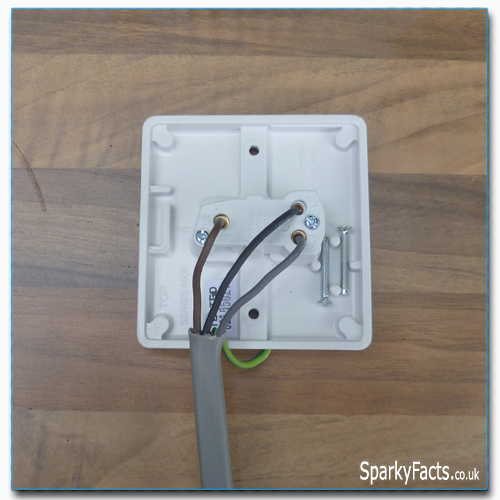
Do not forget to connect the Earth conductors to the Earth terminal provided!
Once tested and connected to the live supply the lighting circuit will be operational.
Extending the two-way lighting circuit
Now you know how to wire a two-way lighting circuit with one light switched at two points.
What if you need more than one light switched?
Additional lights can be connected parallel to the first light. Think of it as loops from one light to another, as many as needed, all parallel to each other (Line to Line and Neutral to Neutral).
What if you have to wire up other areas with different switching arrangements from the same circuit?
To achieve this, just continue the supply cable from the first light to the second area. Think of it as lopping the supply cable from one area to the next one, always from the first light to the first light in the next area.
Please have a look at the extended wiring diagram (click to enlarge):
Of course, once the supply is in the new area, a new switching arrangement will have to be wired up to operate the light or lights in the area.
This concludes our guide for wiring a two-way lighting circuit. On the next pages we'll describe how to wire a three-way lighting circuit.
![]() Do not forget - electricity kills! Make sure you take all the precautions necessary to work safe. Before working on an existing electrical installation, or before connecting a new circuit to one - carry out a full Safe Isolation Procedure! This guide will help you understand the procedure required. Work smart! Work safe!
Do not forget - electricity kills! Make sure you take all the precautions necessary to work safe. Before working on an existing electrical installation, or before connecting a new circuit to one - carry out a full Safe Isolation Procedure! This guide will help you understand the procedure required. Work smart! Work safe!